Pattern Resizing
Resizing patterns is a question I get a lot, so I thought it would be helpful to have an article here to refer to.
Most downloadable patterns are in PDF format. Download the latest version of Adobe Reader to read and print PDF Files. It’s a great tool for reducing and enlarging patterns and best of all it’s free
*An important note: Many patterns already include seam allowance. All of my patterns do. Therefore, you need to keep in mind that by resizing the pattern pieces, you’re also resizing the seam allowance (unless seam allowance isn’t included in the pattern pieces). The easiest thing to do, is print off the pattern pieces at the 100% original size first. Next, trim away the 1/4″ seam allowance (or whatever the included seam allowance is), then place the cut pattern pieces onto a scanner. Scan them into your computer and save them in PDF format. Now you have a file for your pattern without seam allowance.
To get the new percentage size to print at, do the math:
On your calculator enter the size you want your pattern to be. Then divide by the size pattern that you have. Multiply the answer by 100. That gives you the percentage size.
Example: We have a 12″ doll pattern. We would like to resize it to be an 18″ doll pattern. Therefore, we divide 18 ÷ 12 = 1.5. Then we multiply by 100. 1.5 x 100 = 150. We print the pattern out at 150% to enlarge a 12 inch doll to an 18 inch doll.
Printing out the resized pattern.
- Open up the PDF file using Adobe Reader.
- Once the file is opened up, click on “File” in the upper left corner of Adobe, it will drop down a menu, click on “Print”.
- If you’re reducing the original pattern size to print less than 100%, under the “Page sizing and handling” section, click the circle that says “Custom scale” and enter the new percentage size that you calculated here. Then click “Print”. Tip: Make sure you’re only resizing the pattern piece pages and not the entire tutorial

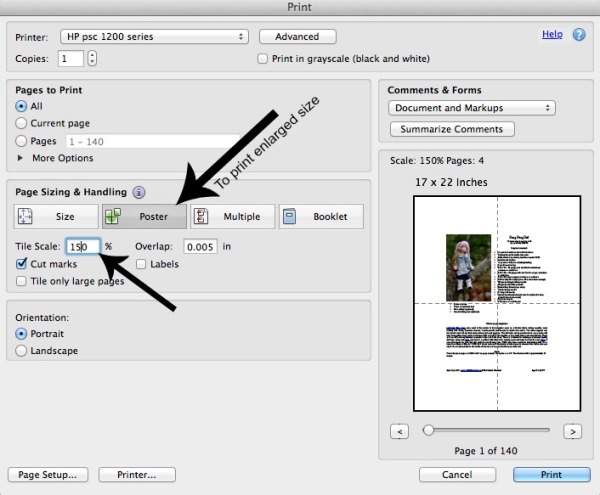
If you’re enlarging the original pattern size to print more than 100%, under the “Page sizing and handling” section click on the “poster” tab. There’s a place called “Tile scale” enter the new percentage amount in the “Tile scale” box. Then click “Print”. Now the enlarged pieces will print in tiled sections, which you can tape together to make one large picture.
iiii. Add the seam allowance to your newly sized pattern pieces. (Or you can instead trace your pattern pieces as they are onto the fabric with invisible ink marker and sew directly on the traced lines and then cut out around the shapes leaving the desired seam allowance around the stitching).